2023年秋季《高级云计算》课程实践作业二 承载环境
创建机器时全部使用 SSH 密码对。所有机器均属于同一个 虚拟交换机 和 同一个安全组,内部全部放通。
配置过程 基础环境 修改主机名与配置Host 创建时每个机器主机名字已经生成好,无需修改。为每台主机的 /etc/hosts 添加以下内容。
1
2
3
192.168.0.31 ceph1 192.168.0.32 ceph2 192.168.0.33 ceph3
而后用 ping 检查连通性。
配置免密登录 在 ceph1 机器上生成SSH密钥,而后 手动 分发到 ceph1, ceph2 和 ceph3 。最后验证SSH可用性。
关闭防火墙与SELinux 关闭防火墙。
1
2
3
systemctl stop firewalld systemctl disable firewalld systemctl status firewalld
SELinux本身就是关闭的。不用操作。
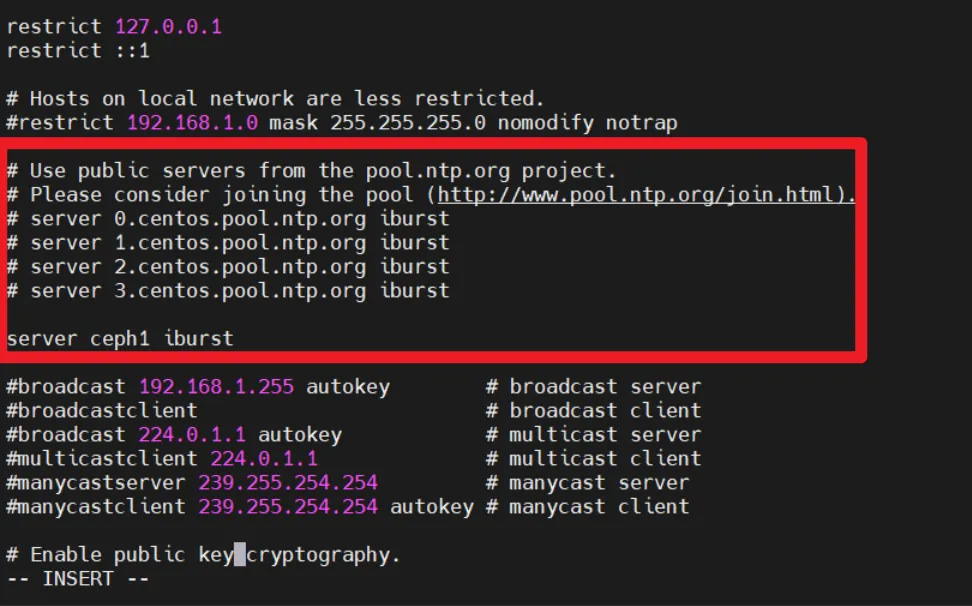
配置NTP 每个节点安装ntp。
使ceph2、ceph3节点同步ceph1的时间,在ceph2、ceph3节点修改 /etc/ntp.conf。注释时间服务器,并添加ceph1节点作为时间服务器。
每个节点开启 ntpd 并查看状态,确保为 active 。
1
2
systemctl start ntpd systemctl status ntpd
在 ceph2 和 ceph3 节点确认ntp服务器指向ceph1节点。
得到如下输出。
1
2
3
4
5
[root@ceph2 ~]# ntpq -pn remote refid st t when poll reach delay offset jitter ============================================================================== *192.168.0.31 202.118.1.81 2 u 40 64 3 0.181 -0.477 2.802
1
2
3
4
5
[root@ceph3 ~]# ntpq -pn remote refid st t when poll reach delay offset jitter ============================================================================== *192.168.0.31 202.118.1.81 2 u 16 64 3 0.221 -0.623 0.046
安装Ceph 配置Ceph镜像源 新建 /etc/yum.repos.d/ceph.repo 设置其内容为如下内容。
1 2 3 4 5 6 7 8 9 10 11 12 13 14 15 16 17 18 19 20 21 22 23 24 [Ceph ] name=Ceph packages for $basearch baseurl=http://download.ceph.com/rpm-nautilus/el7/$basearch enabled=1 gpgcheck=1 type=rpm-md gpgkey=https://download.ceph.com/keys/release.asc priority=1 [Ceph-noarch ] name=Ceph noarch packages baseurl=http://download.ceph.com/rpm-nautilus/el7/noarch enabled=1 gpgcheck=1 type=rpm-md gpgkey=https://download.ceph.com/keys/release.asc priority=1 [ceph-source ] name=Ceph source packages baseurl=http://download.ceph.com/rpm-nautilus/el7/SRPMS enabled=1 gpgcheck=1 type=rpm-md gpgkey=https://download.ceph.com/keys/release.asc priority=1
而后,更新yum源。
1 yum clean all && yum makecache
正式安装Ceph 对所有节点,安装Ceph。
1 yum -y install librados2-14.2.10 ceph-14.2.10
在 ceph1 节点额外安装 ceph-deploy 。该步骤速度非常慢,受网络影响极大。
1 yum -y install ceph-deploy
在各个节点查看Ceph版本。
以 ceph3 的结果为例。
1
2
[root@ceph3 ~]# ceph -v ceph version 14.2.10 (b340acf629a010a74d90da5782a2c5fe0b54ac20) nautilus (stable)
部署MON节点
以下步骤只需要对 ceph1 执行。
创建集群 1 2 cd /etc/cephceph-deploy new ceph1 ceph2 ceph3
修改 ceph.conf 在文件的末尾,添加如下内容。
1 2 [mon] mon_allow_pool_delete = true
初始化并收集密钥 1 ceph-deploy mon create-initial
分发密钥串 1 ceph-deploy --overwrite-conf admin ceph1 ceph2 ceph3
部署MGR节点
以下步骤只需要对 ceph1 执行。
部署MGR节点 1 ceph-deploy mgr create ceph1 ceph2 ceph3
观察集群情况,此时集群已正常启动。
1 2 3 4 5 6 7 8 9 10 11 12 13 14 15 16 [root@ceph1 ceph]# ceph -s cluster: id : d96f2b64-09d5-4363-ae37-8eea5e12cb05 health: HEALTH_OK services: mon: 3 daemons, quorum ceph1,ceph2,ceph3 (age 24s) mgr: ceph1(active, since 9s), standbys: ceph3, ceph2 osd: 0 osds: 0 up, 0 in data: pools: 0 pools, 0 pgs objects: 0 objects, 0 B usage: 0 B used, 0 B / 0 B avail pgs:
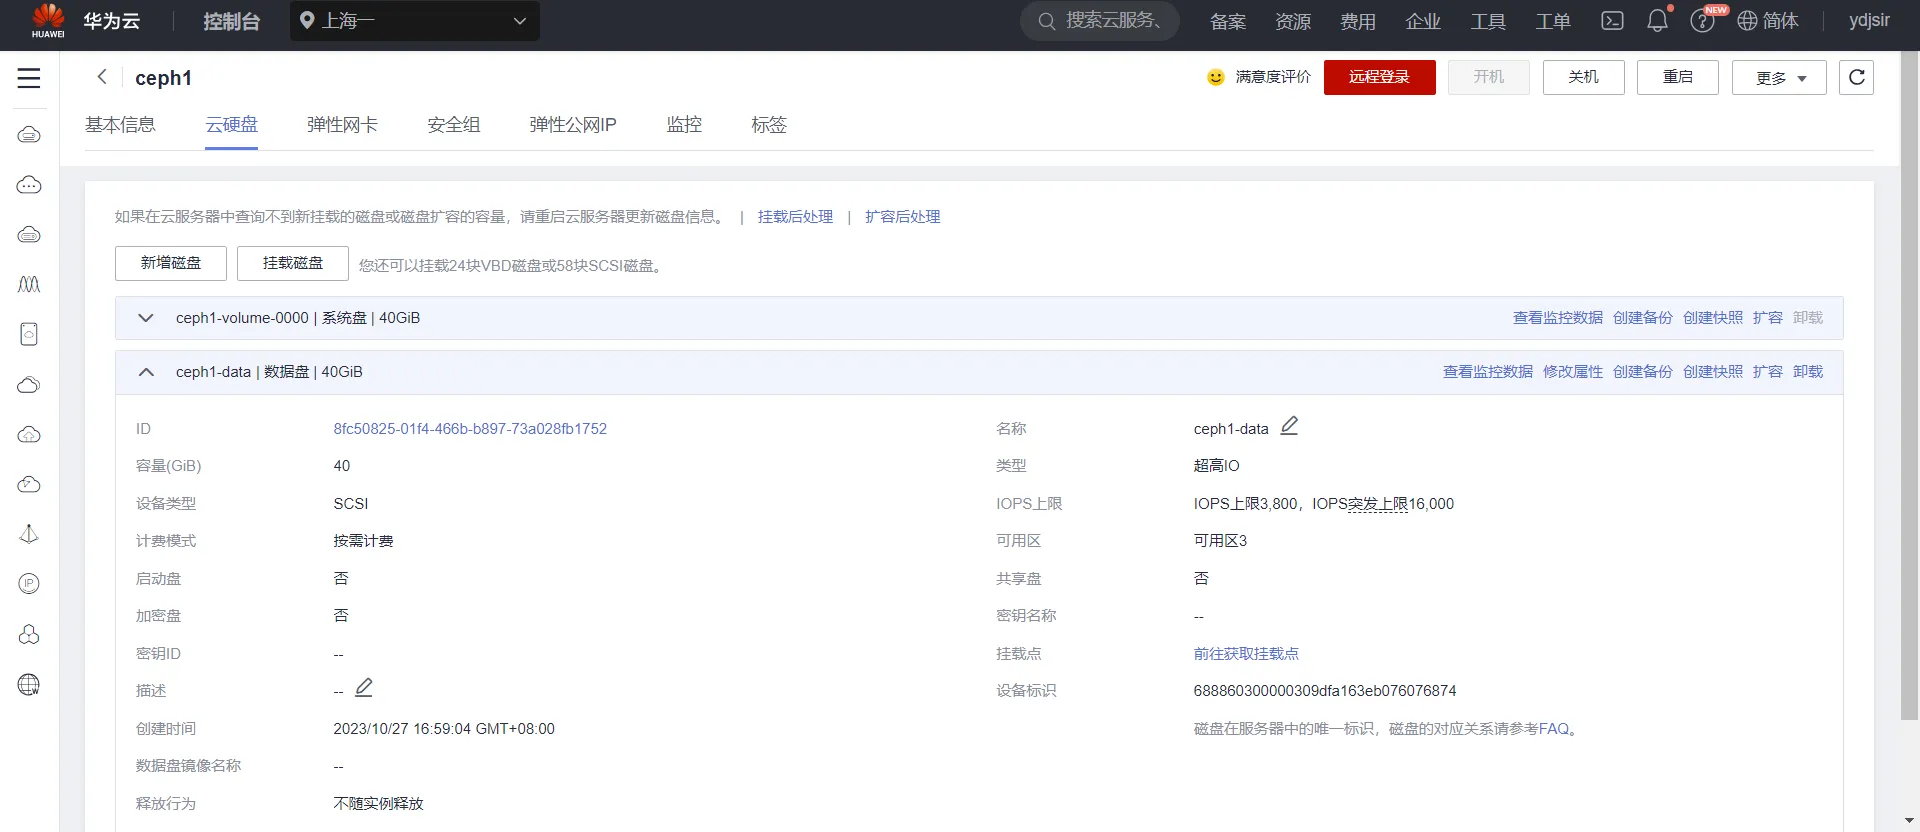
部署OSD节点 做到这一步的时候发现需要给每个服务器实例增购数据盘。于是此处为每台服务器增加了40G的云盘,设备名均为 /dev/sdb 。下面以 ceph1 为例展示效果。
华为云会提示需要磁盘初始化。但是我们并不需要。我们不需要对这些磁盘进行分区,建立文件系统。此时三台机器重启后会自动启动 ceph 集群。
先展示一下磁盘情况 (以 ceph1 为例)。
1 2 3 4 5 [root@ceph1 ~]# lsblk NAME MAJ:MIN RM SIZE RO TYPE MOUNTPOINT sda 8:0 0 40G 0 disk └─sda1 8:1 0 40G 0 part / sdb 8:16 0 40G 0 disk
在 ceph1 上切换到 /etc/ceph 目录,执行如下目录把三块新加的盘加入集群。
1 2 3 ceph-deploy osd create ceph1 --data /dev/sdb ceph-deploy osd create ceph2 --data /dev/sdb ceph-deploy osd create ceph3 --data /dev/sdb
以 ceph3 为例,展示这样的命令执行的输出。
1 2 3 4 5 6 7 8 9 [ceph3][WARNIN] Running command : /bin/systemctl enable --runtime ceph-osd@2 [ceph3][WARNIN] stderr: Created symlink from /run/systemd/system/ceph-osd.target.wants/ceph-osd@2.service to /usr/lib/systemd/system/ceph-osd@.service. [ceph3][WARNIN] Running command : /bin/systemctl start ceph-osd@2 [ceph3][WARNIN] --> ceph-volume lvm activate successful for osd ID: 2 [ceph3][WARNIN] --> ceph-volume lvm create successful for : /dev/sdb [ceph3][INFO ] checking OSD status... [ceph3][DEBUG ] find the location of an executable [ceph3][INFO ] Running command : /bin/ceph --cluster=ceph osd stat --format=json [ceph_deploy.osd][DEBUG ] Host ceph3 is now ready for osd use.
此时查看一下集群状况,发现已经可以看到部署后可用的空间了。
1 2 3 4 5 6 7 8 9 10 11 12 13 14 15 [root@ceph1 ceph]# ceph -s cluster: id : d96f2b64-09d5-4363-ae37-8eea5e12cb05 health: HEALTH_OK services: mon: 3 daemons, quorum ceph1,ceph2,ceph3 (age 17m) mgr: ceph2(active, since 16m), standbys: ceph1, ceph3 osd: 3 osds: 3 up (since 53s), 3 in (since 53s) data: pools: 0 pools, 0 pgs objects: 0 objects, 0 B usage: 3.0 GiB used, 117 GiB / 120 GiB avail pgs:
验证过程 部署RGW节点 在所有服务端节点安装RGW组件 1 yum -y install ceph-radosgw-14.2.10
创建RGW实例
以下步骤只需要对 ceph1 执行。
1 ceph-deploy rgw create ceph1 ceph2 ceph3
展示一下末10行输出。
1 2 3 4 5 6 7 8 9 10 [ceph3][DEBUG ] write cluster configuration to /etc/ceph/{cluster}.conf [ceph3][WARNIN] rgw keyring does not exist yet, creating one [ceph3][DEBUG ] create a keyring file [ceph3][DEBUG ] create path recursively if it doesn't exist [ceph3][INFO ] Running command: ceph --cluster ceph --name client.bootstrap-rgw --keyring /var/lib/ceph/bootstrap-rgw/ceph.keyring auth get-or-create client.rgw.ceph3 osd allow rwx mon allow rw -o /var/lib/ceph/radosgw/ceph-rgw.ceph3/keyring [ceph3][INFO ] Running command: systemctl enable ceph-radosgw@rgw.ceph3 [ceph3][WARNIN] Created symlink from /etc/systemd/system/ceph-radosgw.target.wants/ceph-radosgw@rgw.ceph3.service to /usr/lib/systemd/system/ceph-radosgw@.service. [ceph3][INFO ] Running command: systemctl start ceph-radosgw@rgw.ceph3 [ceph3][INFO ] Running command: systemctl enable ceph.target [ceph_deploy.rgw][INFO ] The Ceph Object Gateway (RGW) is now running on host ceph3 and default port 7480
查看一下集群的状态。
1 2 3 4 5 6 7 8 9 10 11 12 13 14 15 16 17 18 [root@ceph1 ceph]# ceph -s cluster: id : d96f2b64-09d5-4363-ae37-8eea5e12cb05 health: HEALTH_OK services: mon: 3 daemons, quorum ceph1,ceph2,ceph3 (age 22m) mgr: ceph2(active, since 22m), standbys: ceph1, ceph3 osd: 3 osds: 3 up (since 6m), 3 in (since 6m) rgw: 3 daemons active (ceph1, ceph2, ceph3) task status: data: pools: 4 pools, 128 pgs objects: 190 objects, 2.7 KiB usage: 3.0 GiB used, 117 GiB / 120 GiB avail pgs: 128 active+clean
可以看到RGW已经成功启动了。
创建存储池 创建存储池 创建并查看名为 pooltest 的存储池。
1 2 3 4 5 6 7 8 9 10 11 12 13 14 15 16 17 18 19 20 21 22 23 24 25 26 27 [root@ceph1 ceph]# ceph osd pool create pooltest 32 32 pool 'pooltest' created [root@ceph1 ceph]# ceph osd pool ls .rgw.root default.rgw.control default.rgw.meta default.rgw.log pooltest [root@ceph1 ceph]# ceph -s cluster: id : d96f2b64-09d5-4363-ae37-8eea5e12cb05 health: HEALTH_OK services: mon: 3 daemons, quorum ceph1,ceph2,ceph3 (age 24m) mgr: ceph2(active, since 24m), standbys: ceph1, ceph3 osd: 3 osds: 3 up (since 8m), 3 in (since 8m) rgw: 3 daemons active (ceph1, ceph2, ceph3) task status: data: pools: 5 pools, 160 pgs objects: 190 objects, 2.7 KiB usage: 3.0 GiB used, 117 GiB / 120 GiB avail pgs: 160 active+clean
可见存储池 pooltest 已被成功创建。
上传文件到存储池 1 2 3 4 5 6 7 8 9 10 11 12 13 14 15 16 17 18 19 20 21 22 23 24 25 [root@ceph1 ~]# echo "hello world" > test.txt [root@ceph1 ~]# rados -p pooltest put test ./test.txt [root@ceph1 ~]# rados -p pooltest ls test [root@ceph1 ~]# rados -p pooltest ls -al Please use --output to specify the output file name [root@ceph1 ~]# ceph -s cluster: id : d96f2b64-09d5-4363-ae37-8eea5e12cb05 health: HEALTH_WARN application not enabled on 1 pool(s) services: mon: 3 daemons, quorum ceph1,ceph2,ceph3 (age 4h) mgr: ceph2(active, since 4h), standbys: ceph1, ceph3 osd: 3 osds: 3 up (since 4h), 3 in (since 4h) rgw: 3 daemons active (ceph1, ceph2, ceph3) task status: data: pools: 5 pools, 160 pgs objects: 191 objects, 2.7 KiB usage: 3.0 GiB used, 117 GiB / 120 GiB avail pgs: 160 active+clean
对新加入的存储池进行标记。
1 2 3 4 5 6 7 8 9 10 11 12 13 14 15 16 17 18 19 20 [root@ceph1 ~]# ceph osd pool application enable pooltest rgw enabled application 'rgw' on pool 'pooltest' [root@ceph1 ~]# ceph -s cluster: id : d96f2b64-09d5-4363-ae37-8eea5e12cb05 health: HEALTH_OK services: mon: 3 daemons, quorum ceph1,ceph2,ceph3 (age 4h) mgr: ceph2(active, since 4h), standbys: ceph1, ceph3 osd: 3 osds: 3 up (since 4h), 3 in (since 4h) rgw: 3 daemons active (ceph1, ceph2, ceph3) task status: data: pools: 5 pools, 160 pgs objects: 191 objects, 2.7 KiB usage: 3.0 GiB used, 117 GiB / 120 GiB avail pgs: 160 active+clean
由此,文件已被成功上传并可以被下载。
下载文件到本地 先删除本地文件,而后从存储池下载文件。
1 2 3 4 5 6 7 8 9 [root@ceph1 ~]# ls ceph-deploy-ceph.log test.txt [root@ceph1 ~]# rm test.txt rm : remove regular file ‘test.txt’? y[root@ceph1 ~]# ls ceph-deploy-ceph.log [root@ceph1 ~]# rados -p pooltest get test ./test.txt [root@ceph1 ~]# ls ceph-deploy-ceph.log test.txt
验证S3接口 创建rgw用户
以下步骤只需要对 ceph1 执行。
创建一个用户为 admin,access_key为test1,secret_key为test1。而后查询该账户信息。
1 2 3 4 5 6 7 8 9 10 11 12 13 14 15 16 17 18 19 20 21 22 23 24 25 26 27 28 29 30 31 32 33 34 35 36 37 38 39 40 41 42 43 44 45 46 47 48 49 50 51 52 53 54 55 56 57 58 59 60 61 62 63 64 65 66 67 68 69 70 71 72 73 74 75 76 77 78 79 [root@ceph1 ~]# radosgw-admin user create --uid=admin --display-name=admin --access-key=test1 --secret-key=test1 { "user_id" : "admin" , "display_name" : "admin" , "email" : "" , "suspended" : 0, "max_buckets" : 1000, "subusers" : [], "keys" : [ { "user" : "admin" , "access_key" : "test1" , "secret_key" : "test1" } ], "swift_keys" : [], "caps" : [], "op_mask" : "read, write, delete" , "default_placement" : "" , "default_storage_class" : "" , "placement_tags" : [], "bucket_quota" : { "enabled" : false , "check_on_raw" : false , "max_size" : -1, "max_size_kb" : 0, "max_objects" : -1 }, "user_quota" : { "enabled" : false , "check_on_raw" : false , "max_size" : -1, "max_size_kb" : 0, "max_objects" : -1 }, "temp_url_keys" : [], "type" : "rgw" , "mfa_ids" : [] } [root@ceph1 ~]# radosgw-admin user info --uid=admin { "user_id" : "admin" , "display_name" : "admin" , "email" : "" , "suspended" : 0, "max_buckets" : 1000, "subusers" : [], "keys" : [ { "user" : "admin" , "access_key" : "test1" , "secret_key" : "test1" } ], "swift_keys" : [], "caps" : [], "op_mask" : "read, write, delete" , "default_placement" : "" , "default_storage_class" : "" , "placement_tags" : [], "bucket_quota" : { "enabled" : false , "check_on_raw" : false , "max_size" : -1, "max_size_kb" : 0, "max_objects" : -1 }, "user_quota" : { "enabled" : false , "check_on_raw" : false , "max_size" : -1, "max_size_kb" : 0, "max_objects" : -1 }, "temp_url_keys" : [], "type" : "rgw" , "mfa_ids" : [] }
安装并配置s3cmd
以下步骤只需要对 ceph1 执行。
安装s3cmd。
编辑 ~/.s3cfg ,在结尾添加如下内容。
1 2 3 4 5 6 [default ] access_key = test1 secret_key = test1 host_base = ceph1:7480 host_bucket = ceph1:7480 use_https = False
创建bucket并查看当前bucket状况。
1 2 3 4 [root@ceph1 ~]# s3cmd mb s3://testbucket Bucket 's3://testbucket/' created [root@ceph1 ~]# s3cmd ls 2023-10-27 13:58 s3://testbucket
上传与下载文件 还是使用之前创建的 test.txt 完成此部分实验。
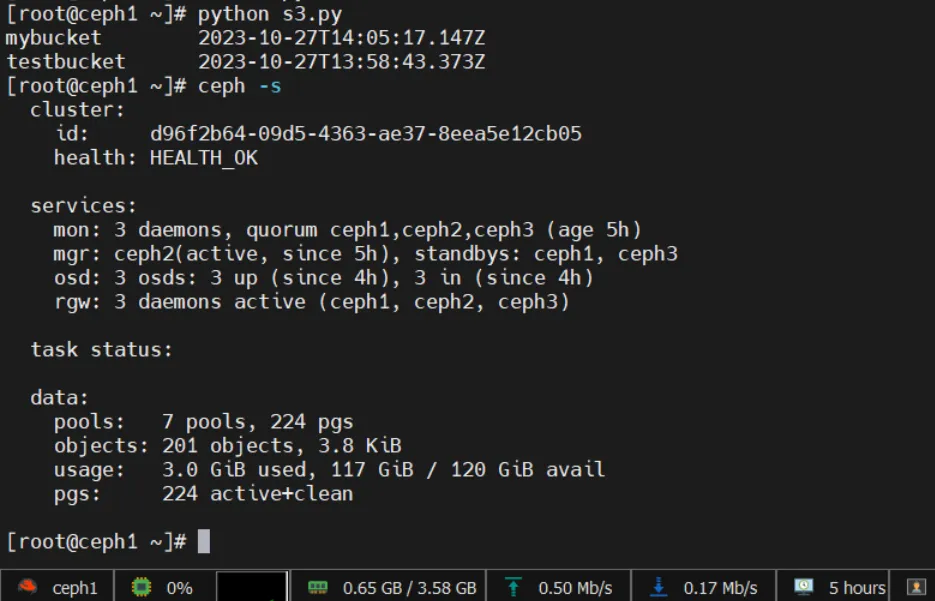
1 2 3 4 5 6 7 8 9 10 11 12 13 14 15 16 17 18 19 20 21 22 23 24 25 26 27 28 [root@ceph1 ~]# s3cmd put test.txt s3://testbucket upload: 'test.txt' -> 's3://testbucket/test.txt' [1 of 1] 12 of 12 100% in 1s 9.63 B/s done [root@ceph1 ~]# s3cmd ls s3://testbucket 2023-10-27 14:00 12 s3://testbucket/test.txt [root@ceph1 ~]# s3cmd get s3://testbucket/test.txt /usr/local download: 's3://testbucket/test.txt' -> '/usr/local/test.txt' [1 of 1] 12 of 12 100% in 0s 296.71 B/s done [root@ceph1 ~]# ll /usr/local/ | grep test.txt -rw-r--r-- 1 root root 12 Oct 27 14:00 test.txt [root@ceph1 ~]# ceph -s cluster: id : d96f2b64-09d5-4363-ae37-8eea5e12cb05 health: HEALTH_OK services: mon: 3 daemons, quorum ceph1,ceph2,ceph3 (age 4h) mgr: ceph2(active, since 4h), standbys: ceph1, ceph3 osd: 3 osds: 3 up (since 4h), 3 in (since 4h) rgw: 3 daemons active (ceph1, ceph2, ceph3) task status: data: pools: 7 pools, 224 pgs objects: 198 objects, 3.4 KiB usage: 3.0 GiB used, 117 GiB / 120 GiB avail pgs: 224 active+clean
由此可见,此时的S3接口已支持文件的上传与下载,且集群始终保持健康。
测试阶段 此部分使用一个Python脚本尝试使用S3接口。CentOS默认有python和python3,无需更新即可。首先安装依赖。
1 yum -y install python-boto
接下来创建一个内容如下的 Python 文件并运行它。该脚本会创建一个名为mybucket的bucket。运行后,集群保持健康。
1 2 3 4 5 6 7 8 9 10 11 12 13 14 15 16 import botoimport boto.s3.connectionaccess_key = 'test1' secret_key = 'test1' conn = boto.connect_s3( aws_access_key_id = access_key, aws_secret_access_key = secret_key, host = 'ceph1' , port= 7480 , is_secure=False , calling_format = boto.s3.connection.OrdinaryCallingFormat(), ) bucket = conn.create_bucket('mybucket' ) for bucket in conn.get_all_buckets(): print "{name}\t{created}" .format ( name = bucket.name, created = bucket.creation_date)
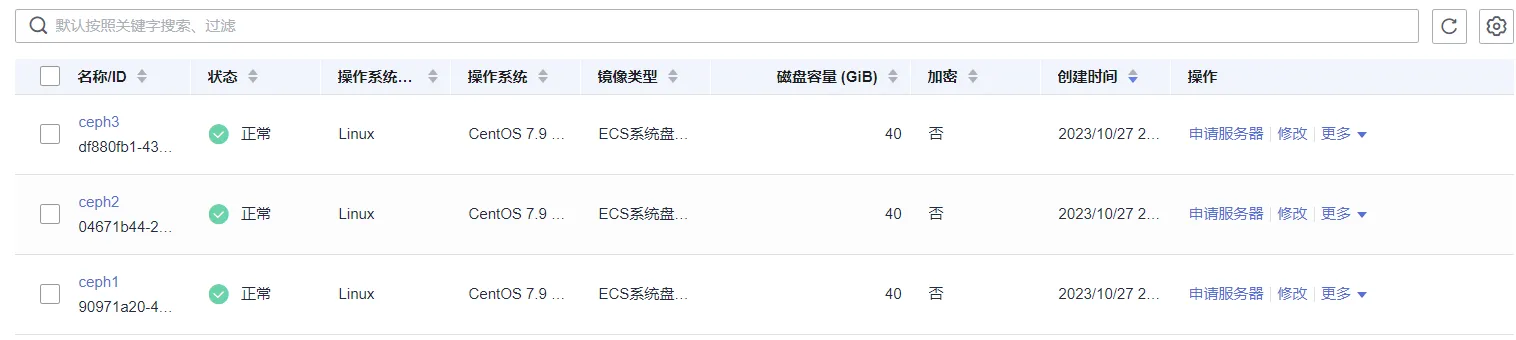
至此,实验完成。将华为云上的三台机器都保存好镜像供下次调用。删除并释放资源,完成本次实验。